The Hosts file is a plain text file in the Windows operating system that maps hostnames to IP addresses. It is used by the operating system to map human-friendly domain names to numerical IP addresses. Editing the Hosts file can be useful for blocking access to specific websites, testing website changes before going live, or redirecting domains to different IP addresses. If you are using Windows 11, the process of editing the Hosts file is similar to earlier versions of Windows. However, there are some slight differences that may be worth noting. In this guide, we will walk you through the steps of how to edit the Hosts file in Windows 11 and provide some tips on what to do if you encounter any issues along the way.
Please note that editing the Hosts file can have serious consequences if done incorrectly. It is important to proceed with caution and make sure you have a backup of the original file before making any changes. With that said, let's dive into the process of editing the Hosts file in Windows 11.
What is a Hosts File?
The Hosts file is a plain text file used by the operating system to map hostnames to IP addresses. It acts as a local DNS (Domain Name System) resolver and provides a simple method for resolving domain names without requiring access to an external DNS server. By default, the Hosts file contains mappings for commonly used network locations such as localhost and loopback.
However, it can be edited to include custom mappings, which can be useful for a variety of purposes such as blocking access to certain websites or redirecting domains to different IP addresses. The Hosts file can be found on most operating systems, including Windows, macOS, and Linux.
What is the purpose of modifying the Hosts file?
Modifying the Hosts file can be useful for a variety of reasons. One common use is to block access to specific websites by redirecting their domain name to a non-existent IP address. This can be helpful for parents who want to prevent their children from accessing certain websites, or for businesses that need to restrict access to social media sites during work hours.Another use for modifying the Hosts file is to test website changes before they go live. By redirecting a domain name to a development server IP address, web developers can test their changes on a live website without affecting the actual site visitors.
In addition, modifying the Hosts file can be useful for web developers who are working on a staging server and need to temporarily redirect traffic to that server for testing purposes.
Overall, modifying the Hosts file can provide a simple and effective method for controlling network traffic and testing website changes. However, it is important to exercise caution when editing the file as incorrect changes can cause serious issues with network connectivity.
Edit the Hosts File in Windows 11
Edit the Hosts File in Windows 11 Using PowerToys
- First, download and install PowerToys from the Microsoft website.
- Once installed, open PowerToys from the Start menu.
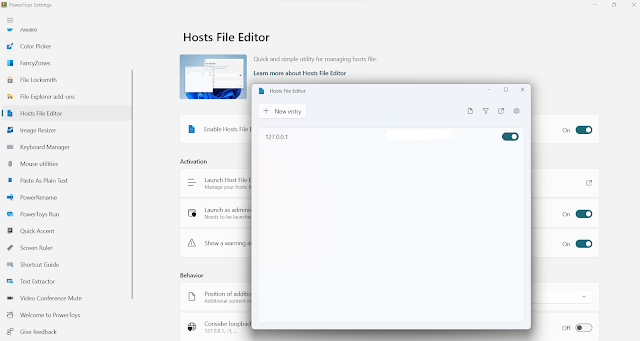
- In the PowerToys window, you will find "Hosts File Editor".
- This will open the Hosts Editor tool.
- To edit the Hosts file, click on the "Lunch Hosts File Editor --> Yes --> Accept --> New Entry
- Make any necessary changes to the file, then save and close it.
- You can now exit the Hosts Editor tool.


